Rules for photographing scenes for recognition
What is a scene?
A scene consists of one or more photos.
Each subsequent photograph is overlapping the previous one.
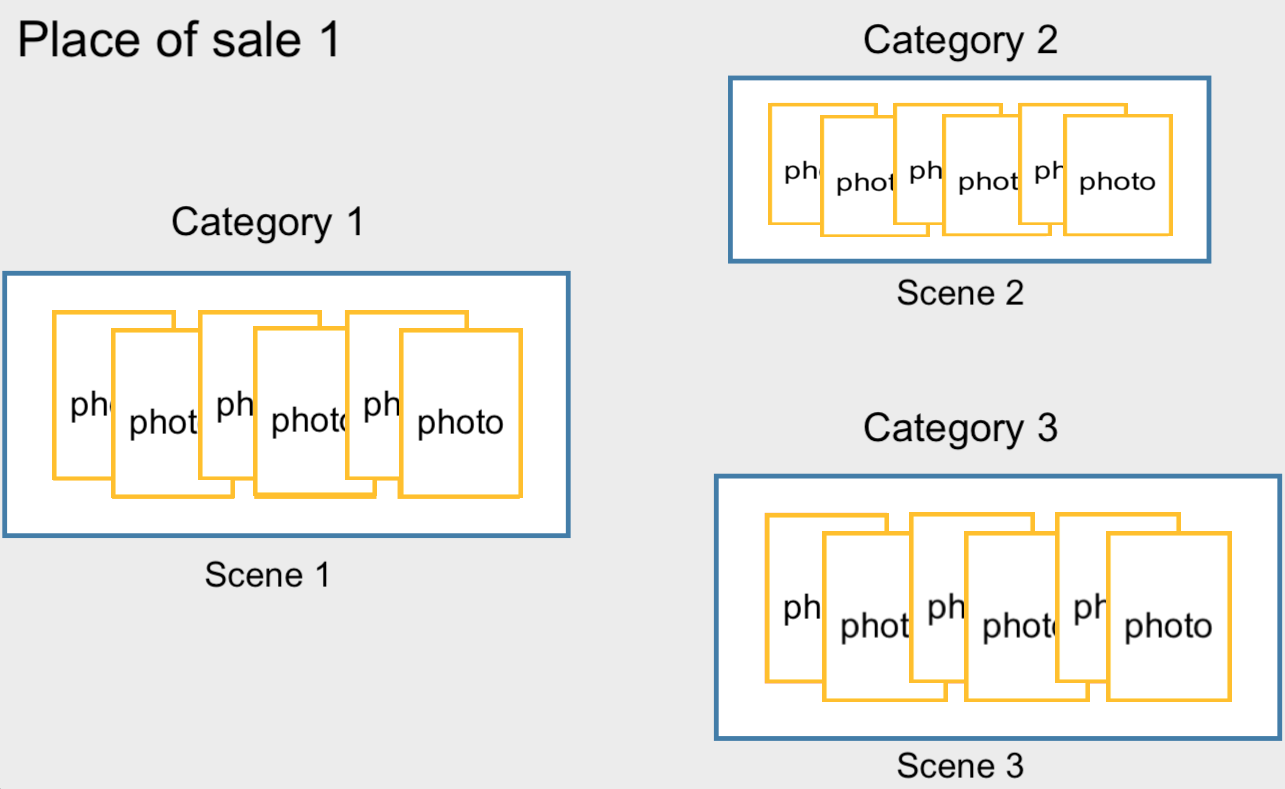
Method of photography
The scene is a set of photographs by category, arranged in a strictly defined order.
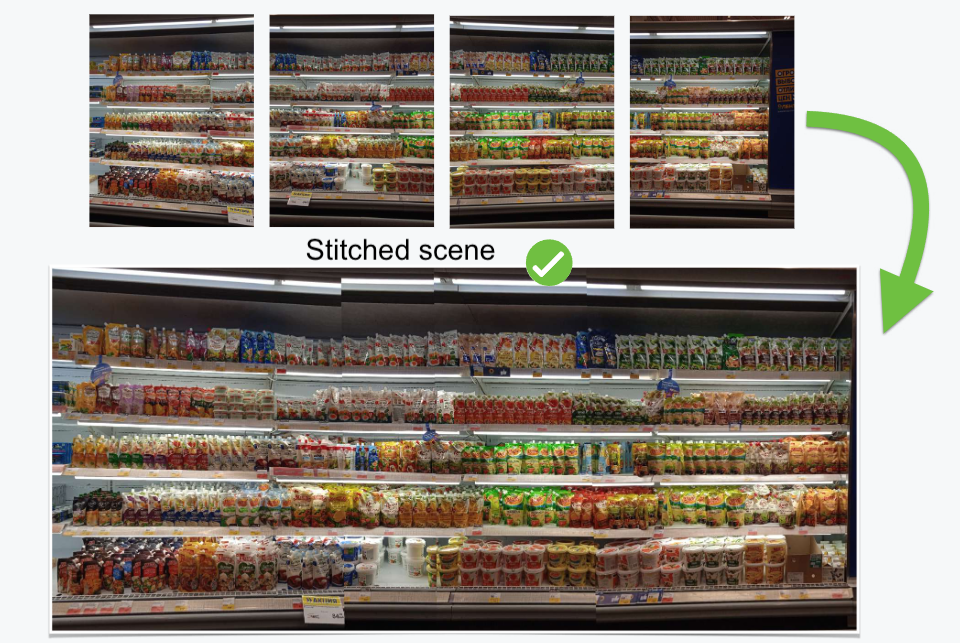
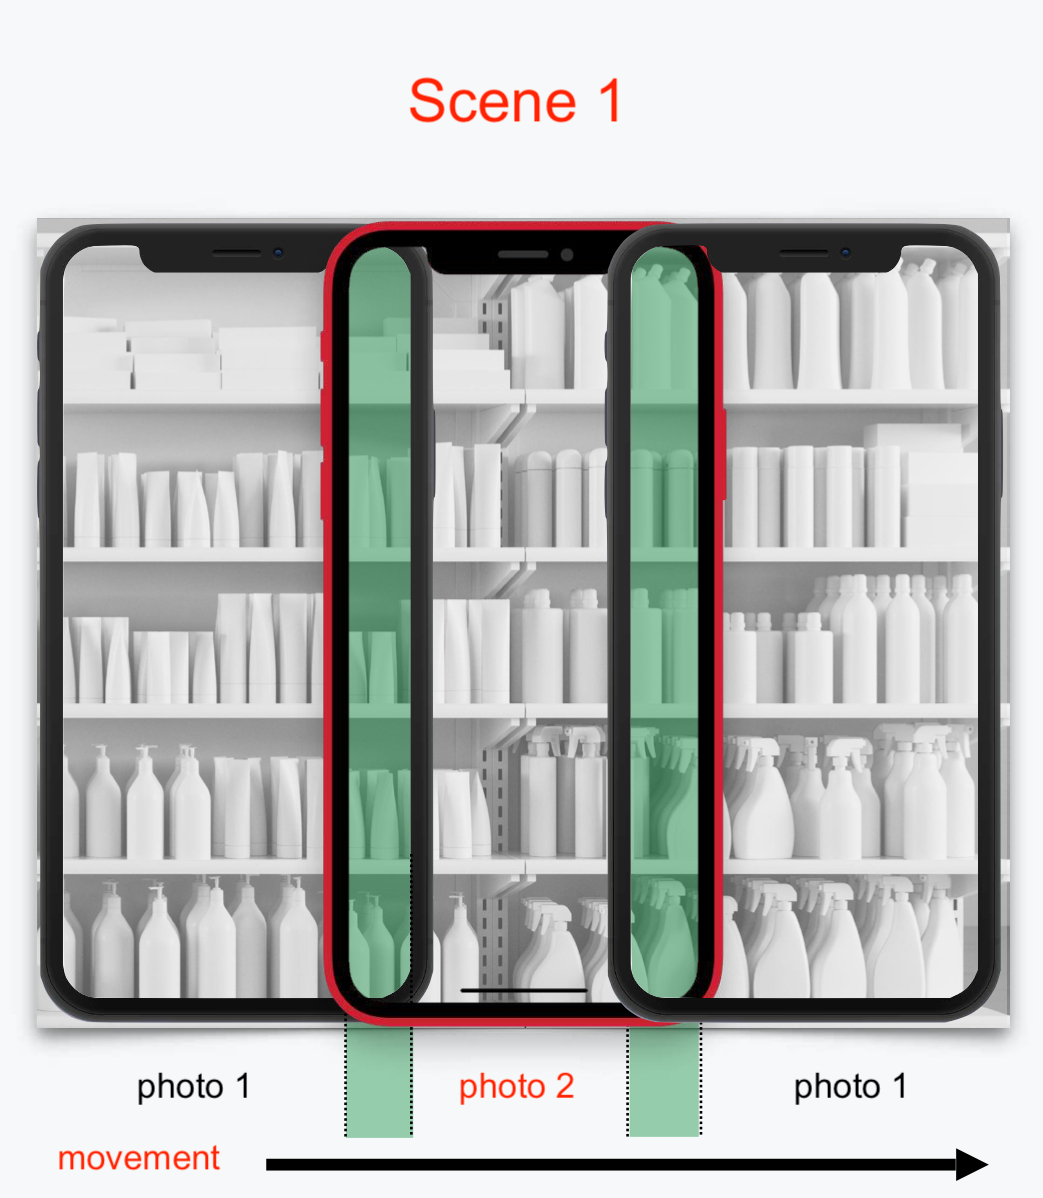
Photo overlap
Photos in the scene are taken with overlap.
Overlapping area is the area of the current photo that has common facings with the neighbouring photo.
Rules of photography
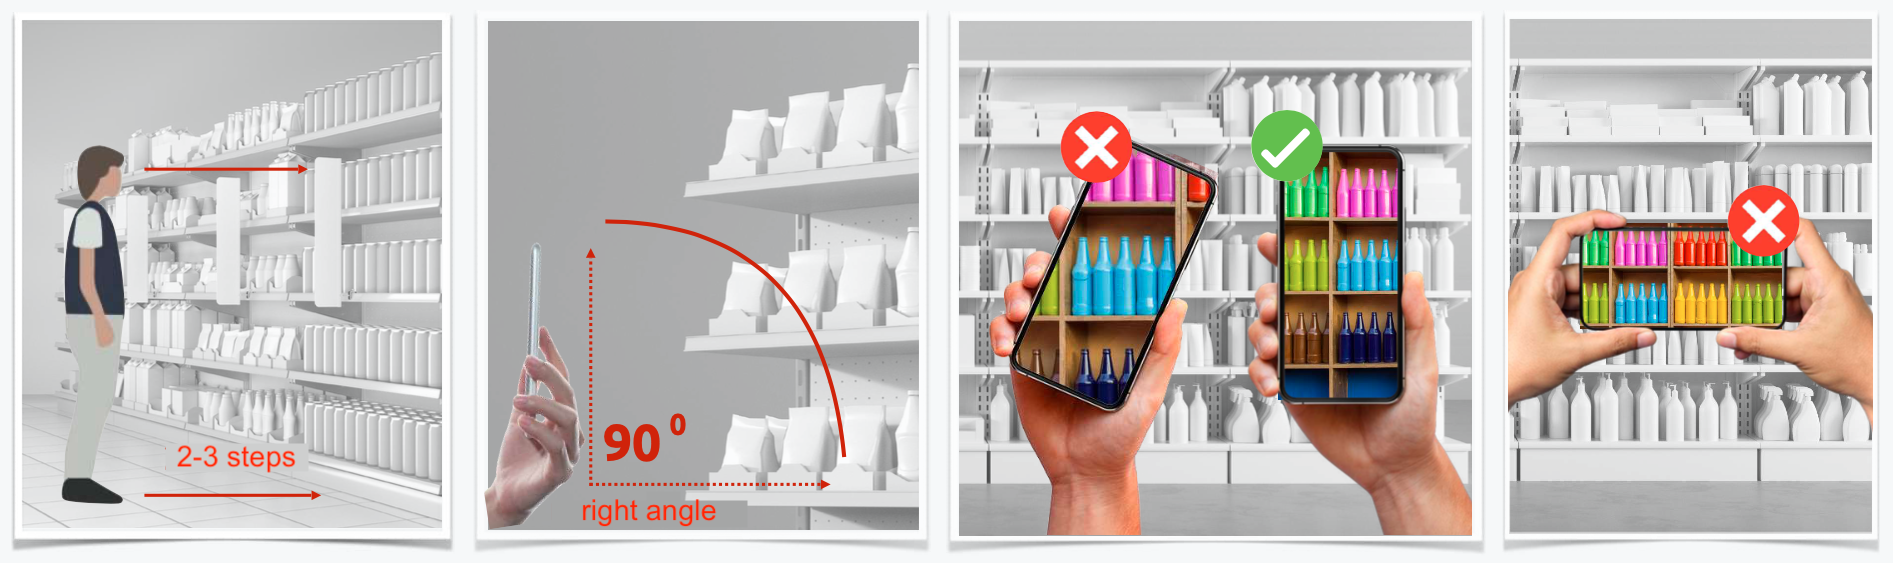
1. Distance to the shelf should be 1-2 metersё;
2. Take photos possibly at 90 degrees from the floor, facing the shelf;
3. Take photos at a right angle, without tilting to the left or right;
4. Do not take photos using landscape mode on your device.
All these rules will help you create conditions for fulfilling the main recognition rule in general:
If a person can determine with the naked eye what kind of product is in the photo, then the neural network will be able to.
Rules of photography
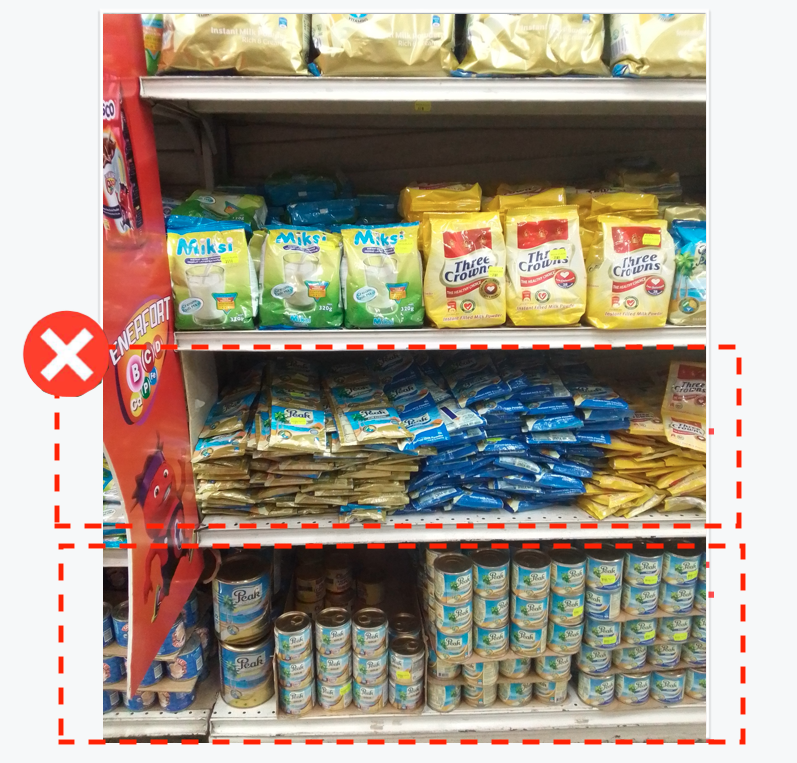
Take photos without storage shelves.
A storage shelf is a lower or upper shelf for storing stock of goods without price tags.
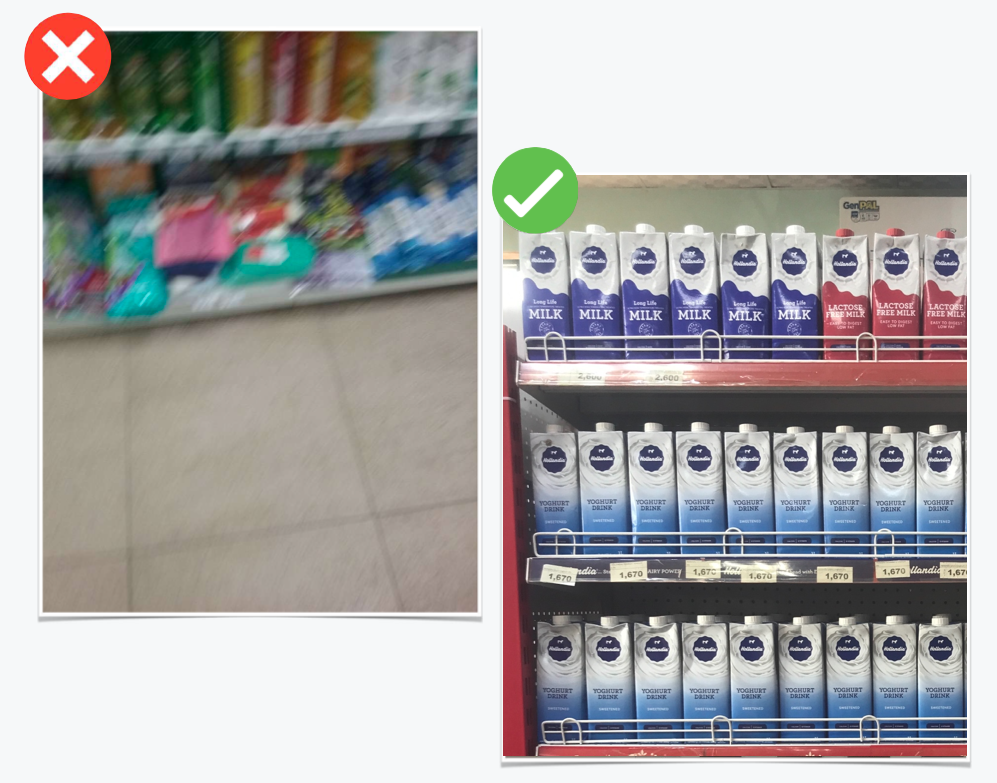
Try to take clear, unblurred photos.
After taking the photo, double-check that the photo is not blurred.
Additional recommendations
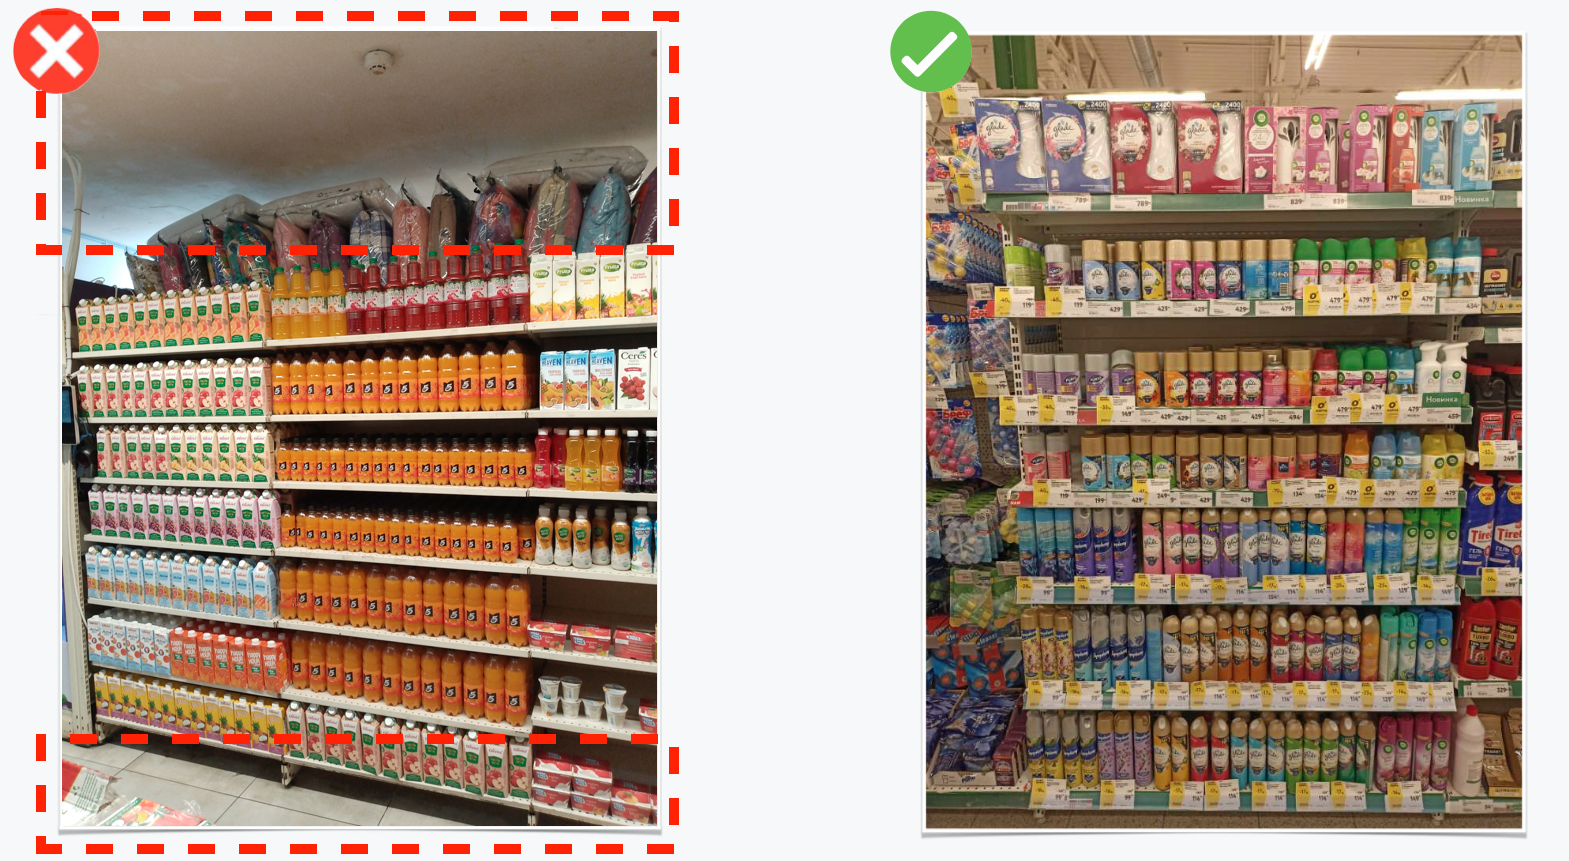
Don't leave too much empty space at the top and bottom of the frame, it's better to take a closer photo.
Filling out a report with neural recognition
Work with neural recognition is carried out at the stage of filling out the Report on availability with recognition.
Filling out the report: Shelf Share
The report is divided into categories, for each of which you must first take a photo, then check for availability. Click on the camera icon opposite «مشهد № 1», and the built-in camera will open.
Take a photo of the scene according to the rules. If there are several points of sale, take several separate scenes.
After completing the photo shooting of scenes, the photos will be
• sent to the server - cloud icon
• then for recognition - eye icon
As soon as the eye icon in the lower right corner disappears, recognition is complete.
You can also scroll down to the end of the report to monitor the process. As soon as a number (number of faces) appears opposite each photo, recognition is complete.
To view the recognition results for each photo, click «تفاصيل».
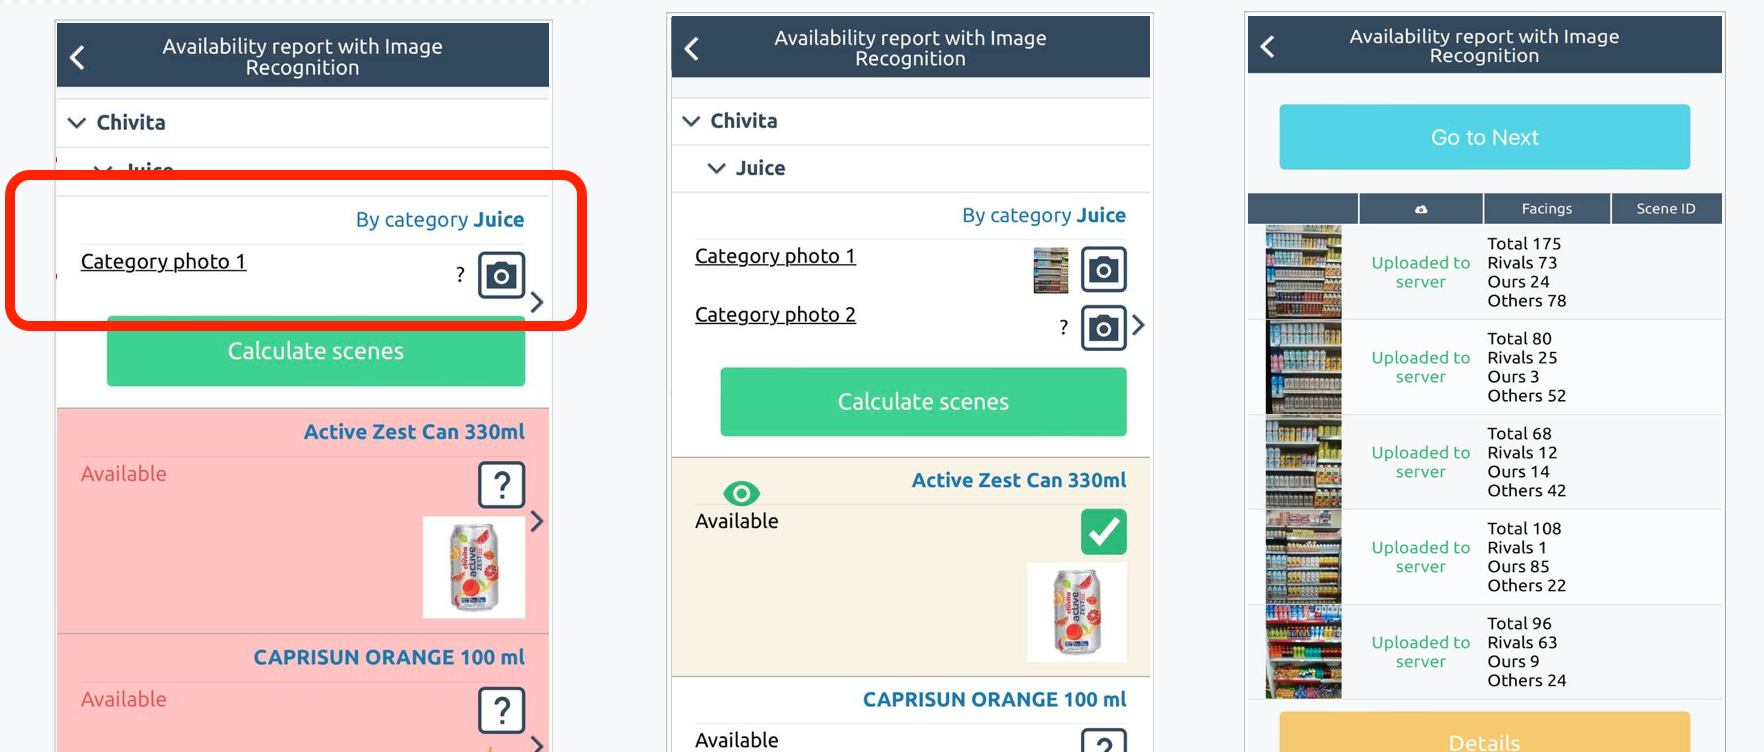
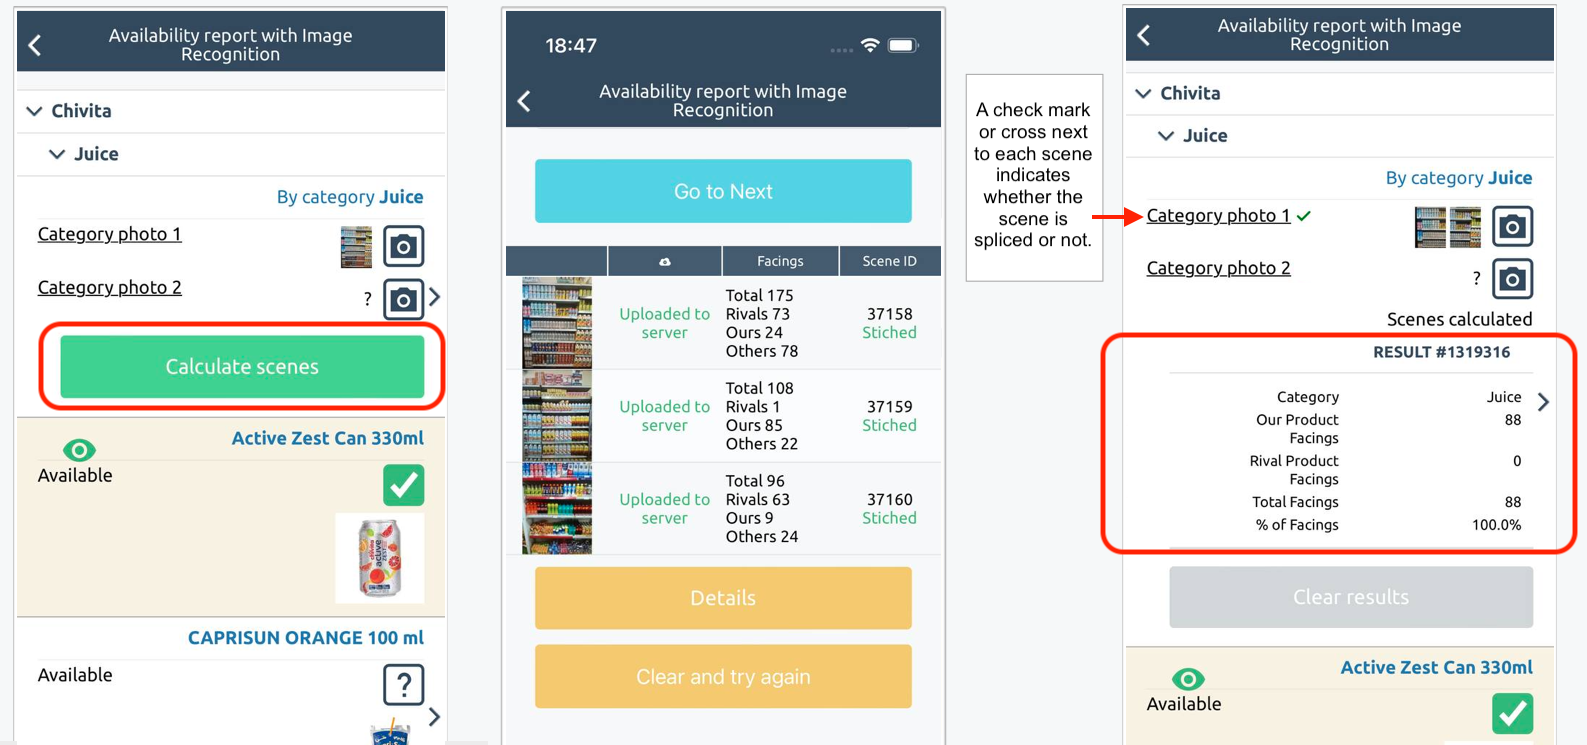
Without waiting for the recognition to complete, you can click the Calculate scenes button.
Clicking it will start the calculation of the shelf share. The actual calculation will only begin after the neural recognition is complete.
To monitor the process of calculating the share, scroll down to the end of the report. The scene ID will be displayed in the right column. The cell background will indicate the counting status.
• yellow - in progress
• green - done
• red - splicing error
After the counting is complete, return to the category. If all scenes are spliced, the result for the shelf share will be displayed.
If you need to re-shoot, first reset the results.
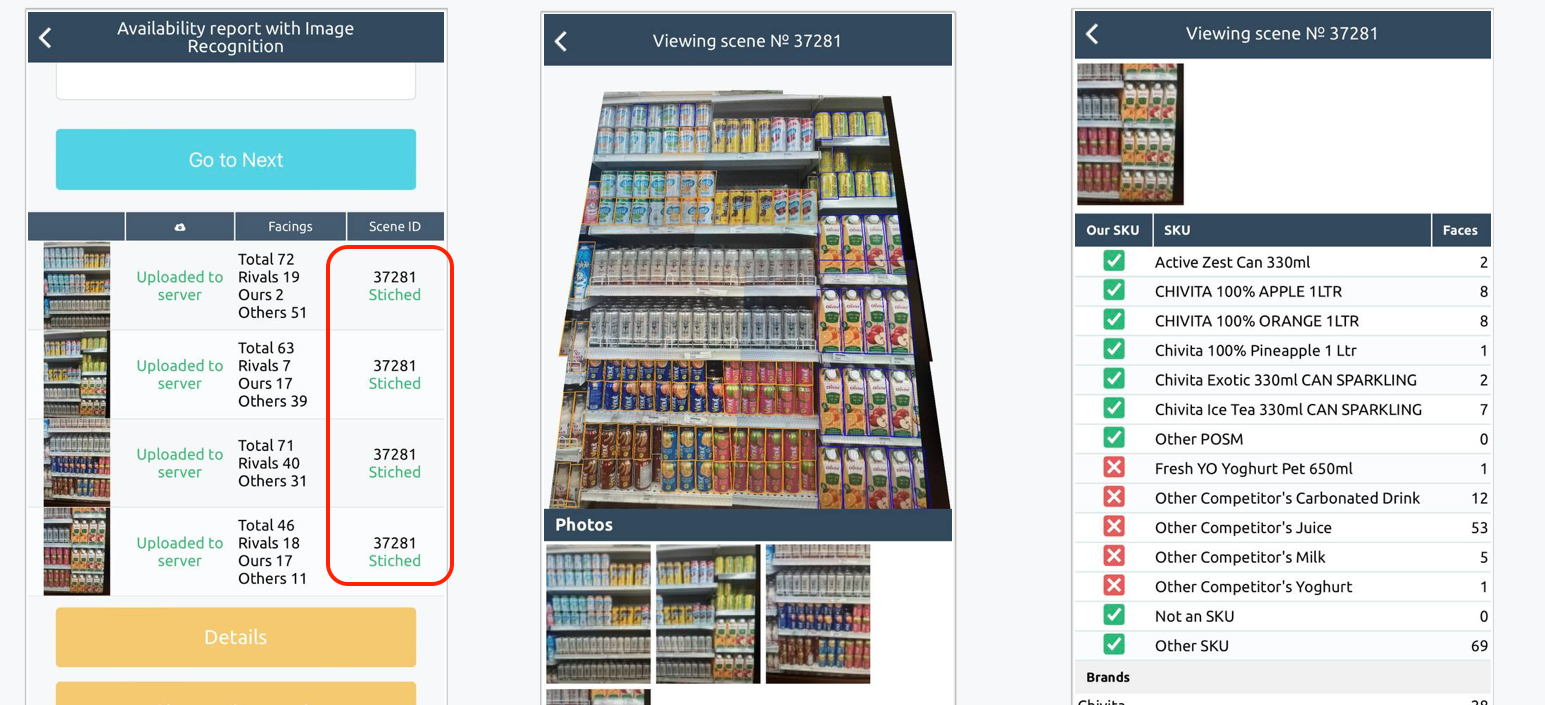
Optional: to view the merged scene and recognized products, you can click on «مشهد № 1. The merged scene and individual photos will be displayed.
The scene can be zoomed in, and photos can be opened to view the recognition results for a specific photo.
Scroll down the page to see the list of recognized products for the entire scene.
Tap a product line to expand the list of all its faces.
Tap a specific face to zoom in on it in the photo.
Filling out the report: availability
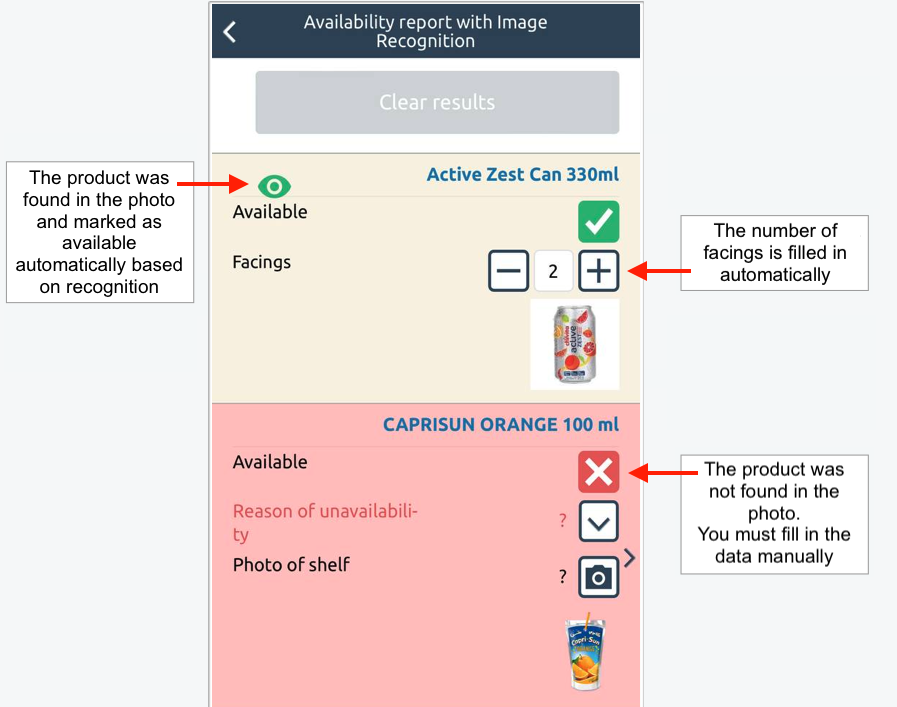
Based on recognition, the availability report is automatically filled in - products found in the photo are automatically marked as «المتاح».
All data filled in automatically - availability and number of faces - can be adjusted manually.
Repeat the steps for all categories.
If any categories are presented on the same shelf, it must be photographed twice for each category.
Multi-line: one line
• Multi-linear is a way of shooting a scene that involves moving left to right along the shelf and photographing in lines from top to bottom.
• Take the first photo on the left side of the shelf.
• Then move to the right so that the last 3-5 faces of the previous photo are the first 3-5 faces of the next photo.
• Take as many photos as you need to fit the entire shelf.
Multi-line: two lines
• If the shelf does not fit in the frame in height, you need to shoot it in several lines.
• Take the first photo in the upper left part of the shelf.
• Then move to the right so that the last 3-5 faces of the previous photo are the first 3-5 faces in the next photo.
• Take as many photos as you need to fit the entire shelf in width. When the first line is shot, do not forget to press the button to go to the line down.
• Return to the beginning of the shelf and take a photo of the bottom of the shelf so that the bottom shelf from the previous photo becomes the top shelf in the next photo.
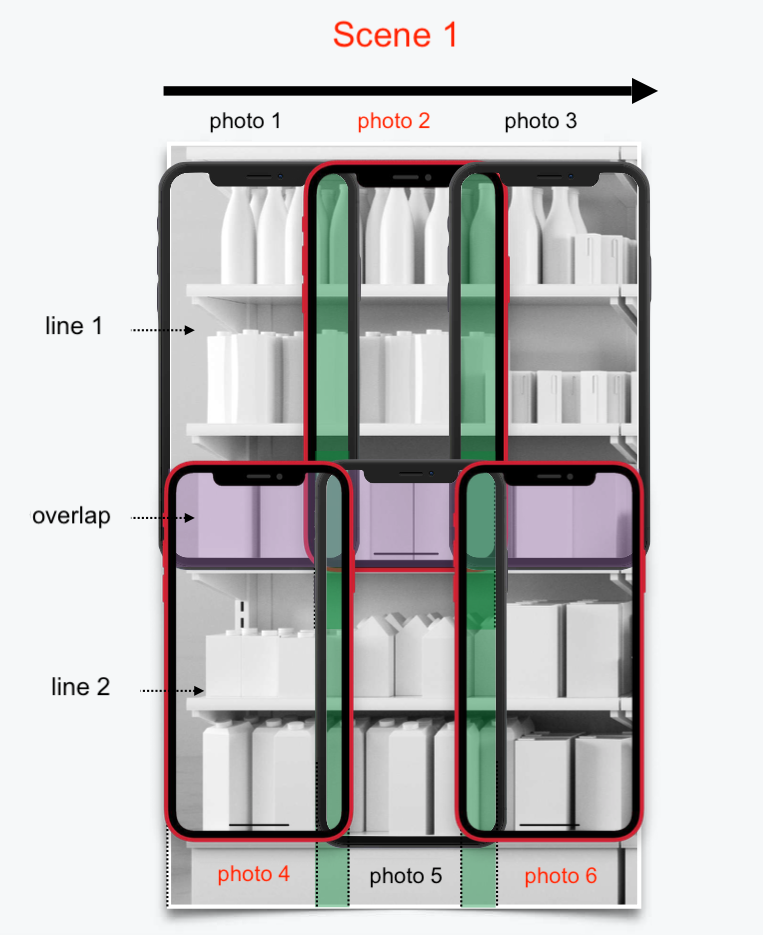
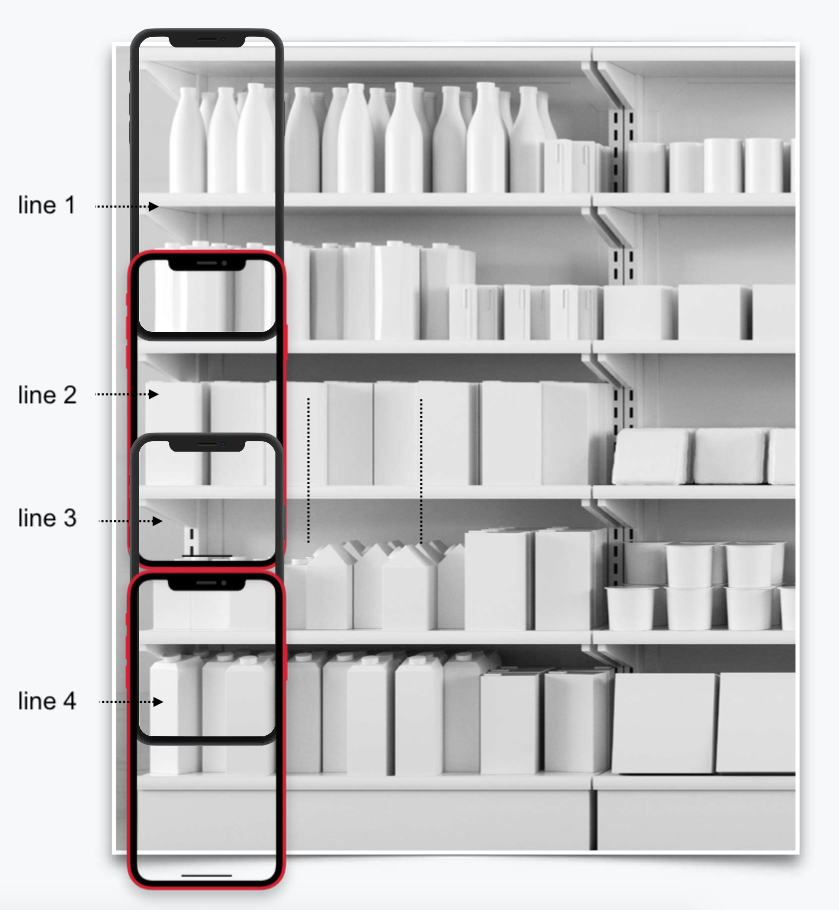
Multiline: multiple lines
• You can go down the line as many times as necessary.
• The number of photos in the lines must match. If they do not match, the application will display an error.
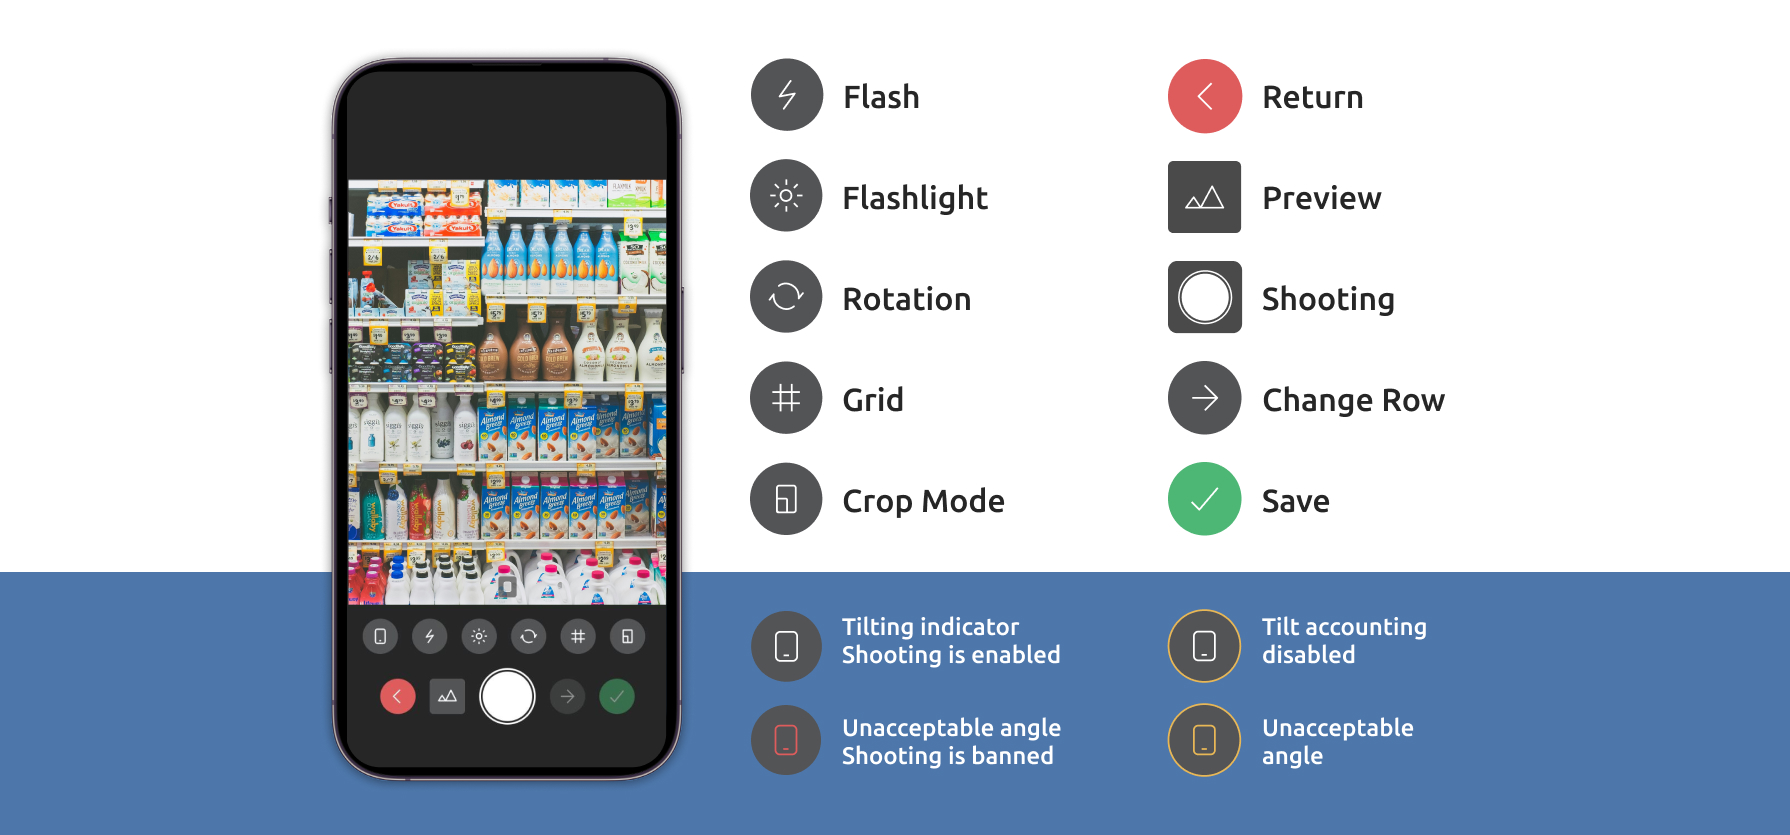
Camera Interface
On iPhone Pro Max and Samsung Ultra devices, you can also shoot with the wide-angle camera - to do this, when opening the camera, tap on 0.5x in the zoom selection.
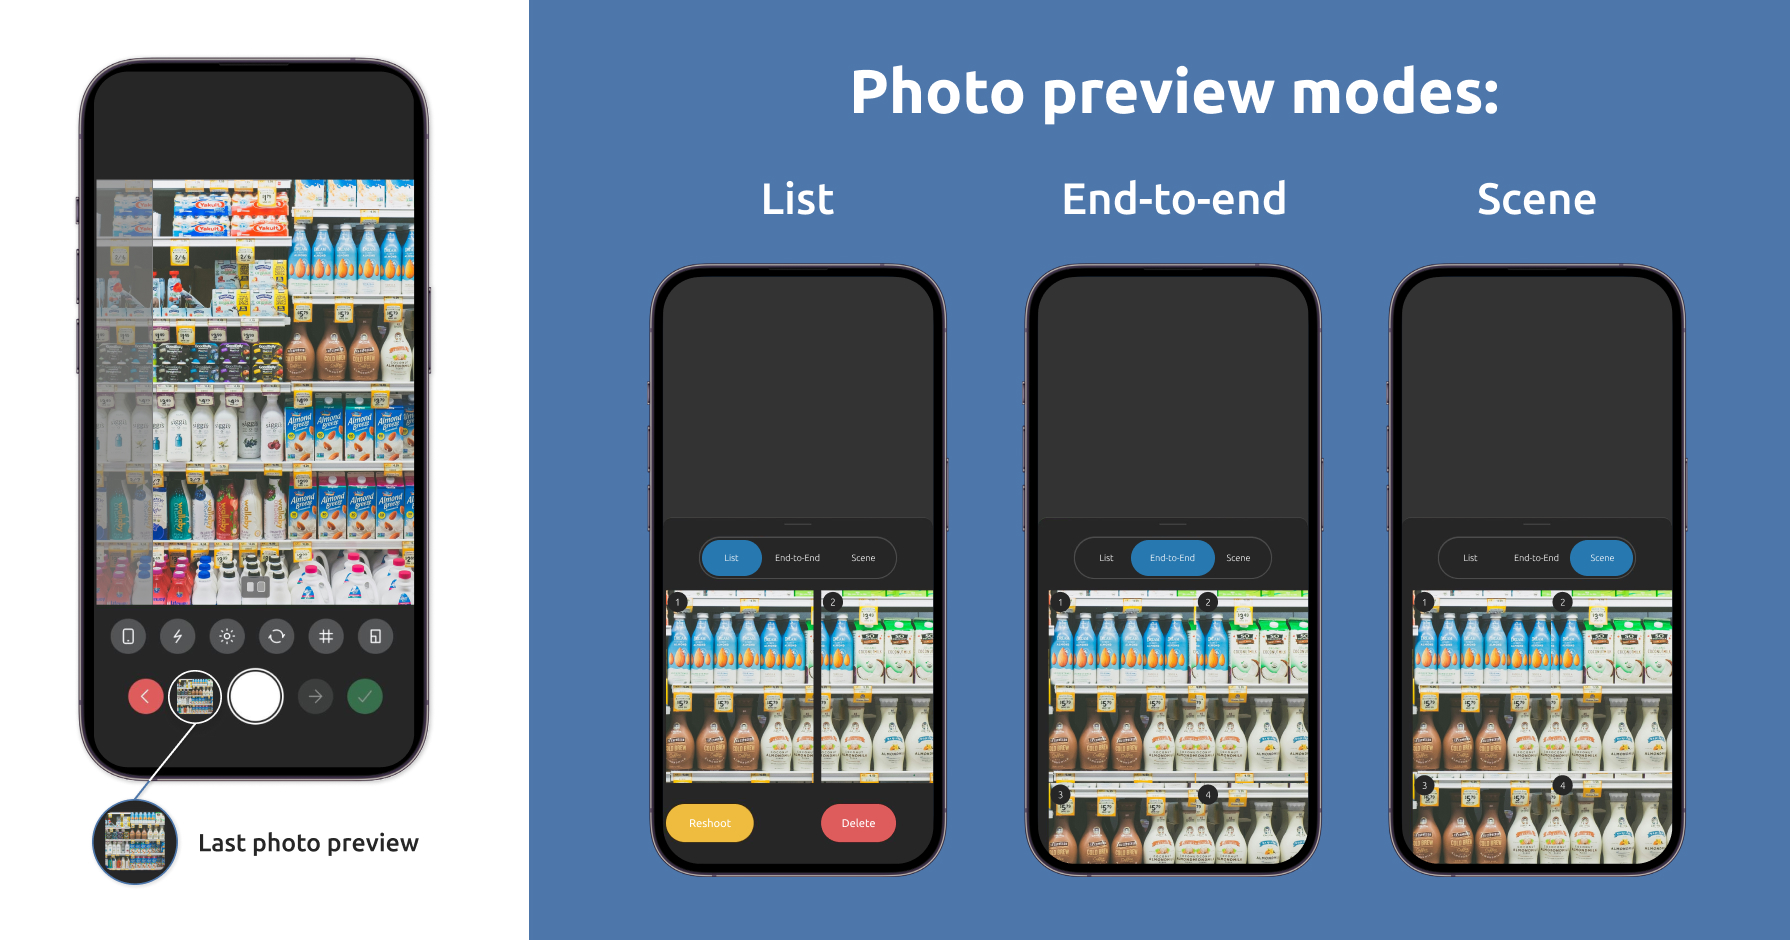
Preview Option
Once you've taken your first photo, a preview of it appears on the bottom of the screen. You can simply click on it to open the preview menu.
In the preview menu you can choose one of three preview modes:
• «List» – all photos are arranged in one row by the shooting order.
• «End-to-end» – all photos are arranged as if it were a scene without overlap.
• «Scene» – all photos are arranged as if it were a scene with overlap.
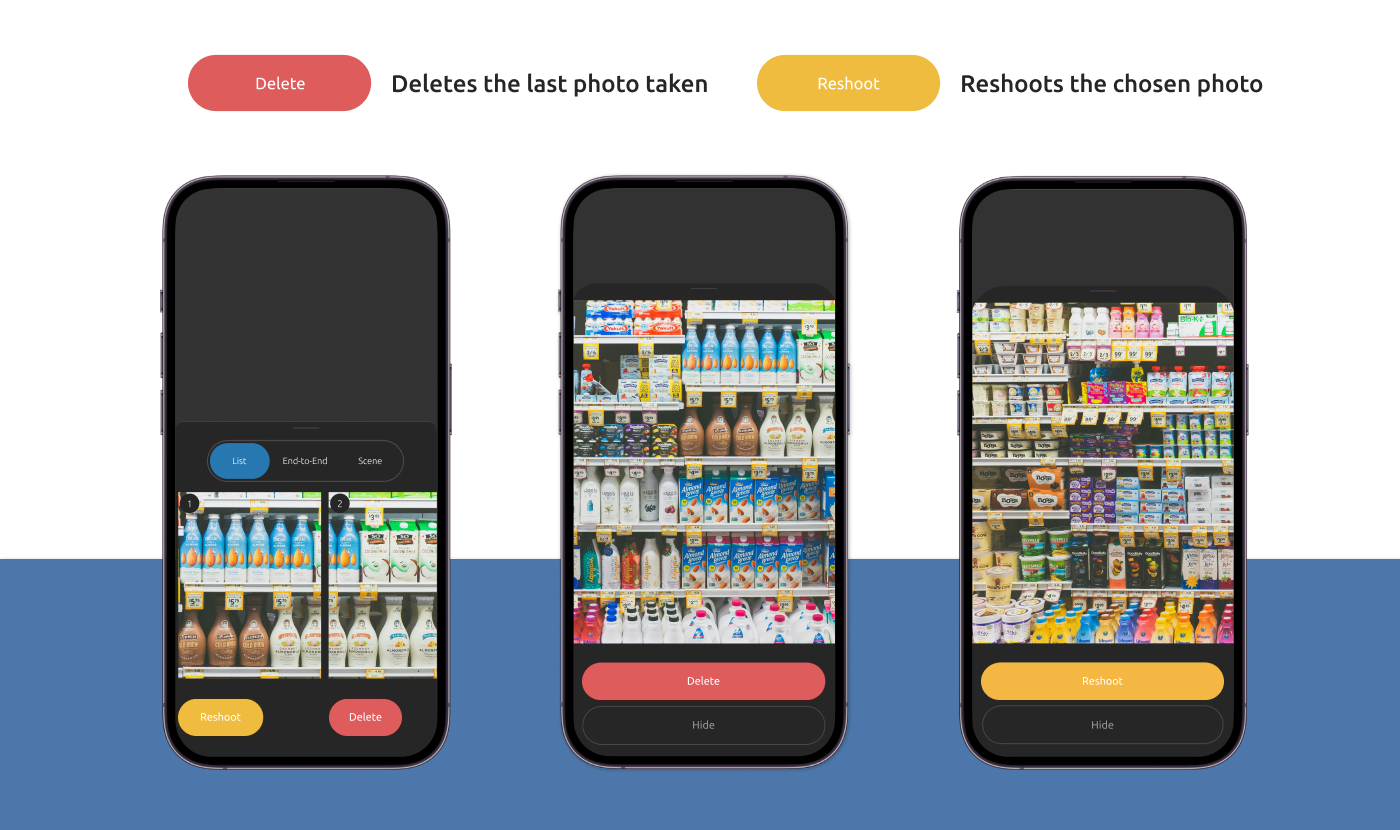
Delete and Reshoot
To delete your last photo open the preview menu and click on a «مسح» button.
Also there you can reshoot any photo from the middle of the scene – click on a "Reshoot" button and take a photo that will replace the previous one.
You can click on any photo to open it in a fullscreen mode.
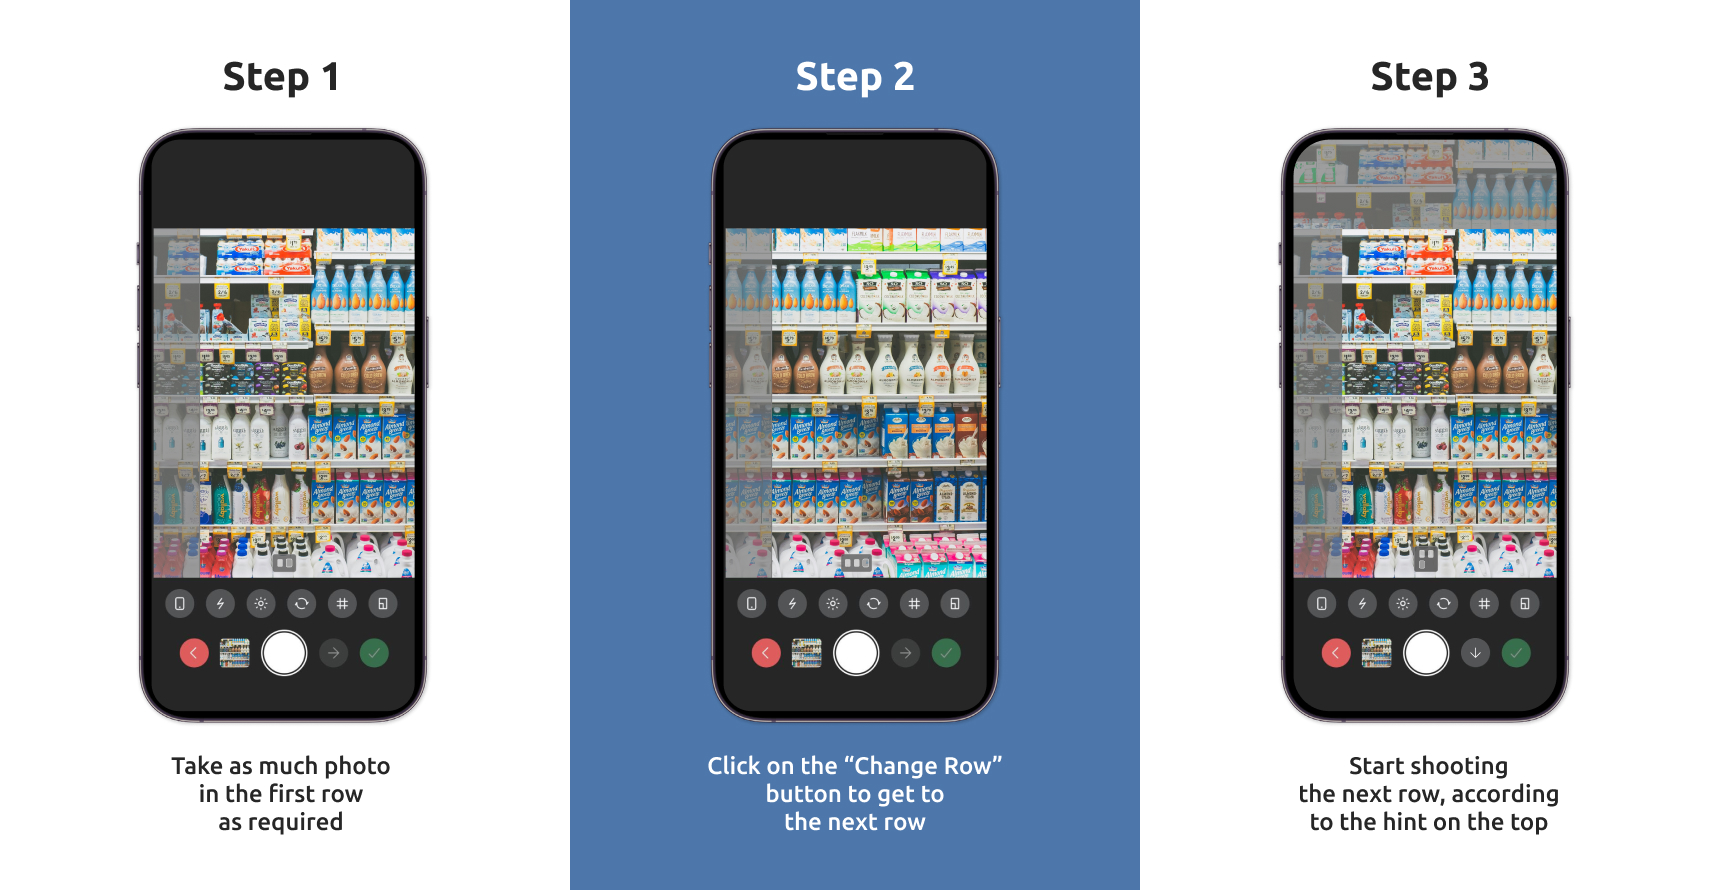
Scene Shooting
Hold your device in the upright position and without any rotation. To shoot a scene you need to take your first photo, afterwards, an overlap hint applies – it shows you where you have to start your next photo to create a correct overlap.
Take as many photos in the first row as needed to accomodate the shelf length. Use the "Change Row" button to get to the next row.
After changing the row, the first one appears on the top of the screen as an overlap hint.
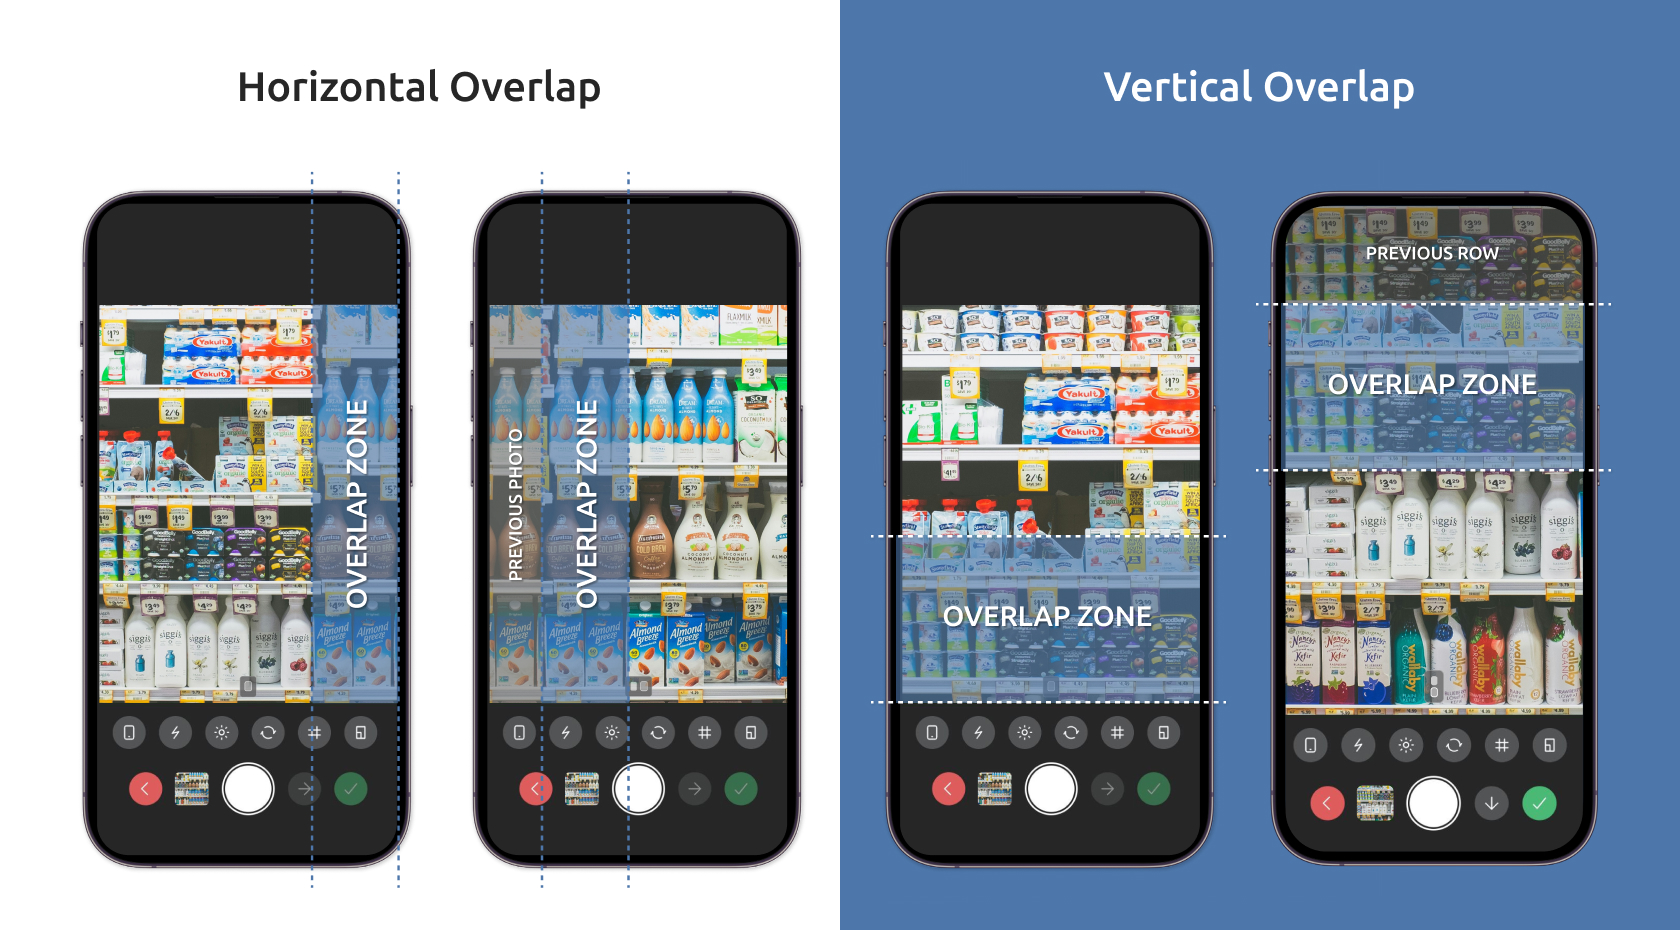
How to make an overlap
The preview of the previous photo is not superimposed on the camera screen. It is located at the joint with the camera screen. You see it on the left (when moving horizontally) and at the top (when moving vertically).
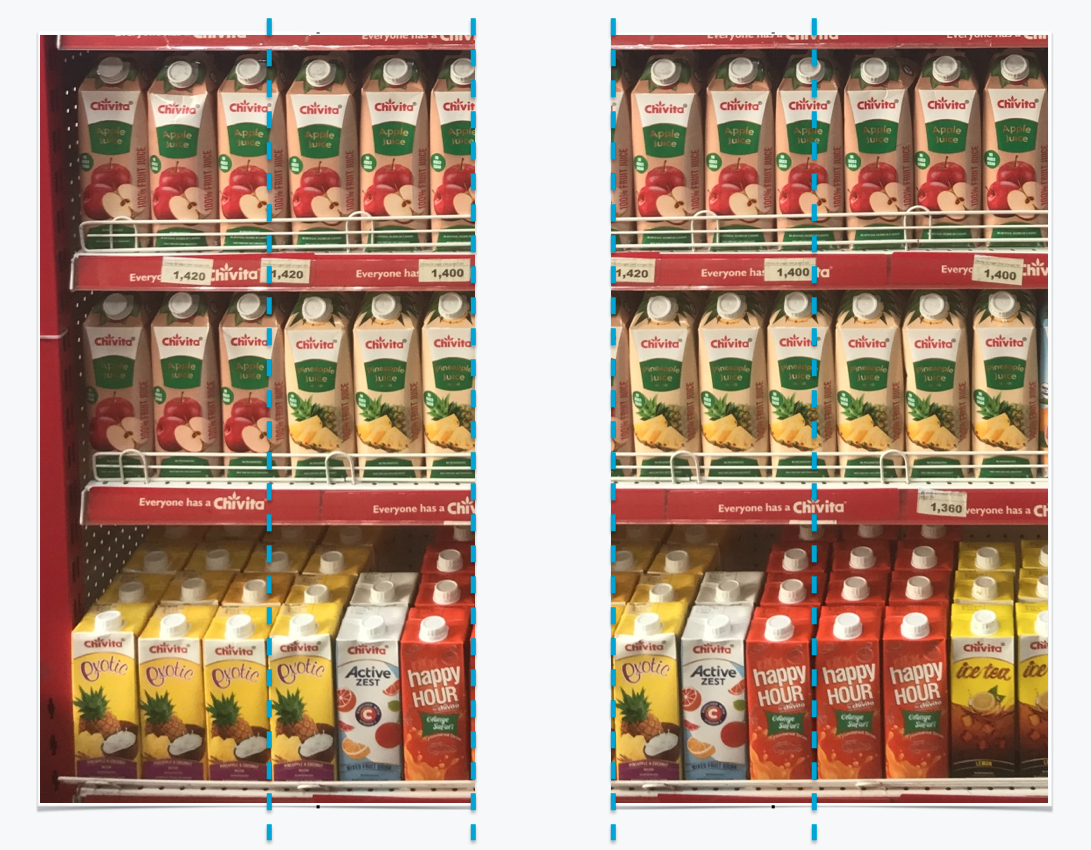
You can see the edge of the previous photo and several faces on it. The number of faces from the previous photo that you will see depends on how close you are photographing. When shooting from afar, you can see 3-6 faces, when shooting close - 1-2. It does not matter.
What is important is that you should see on which face the previous photo ended. And in the next photo horizontally, capture this face and 1-2 faces to the left of it.
This way you will get an overlap of 2-3 faces and (ideally) 20-30% of the photo.
Similarly, when moving vertically. The preview of the previous photo is located at the top, and you see its very bottom edge. Seeing where the previous photo ended, take the next one, observing the overlap of 1-2 shelves vertically.
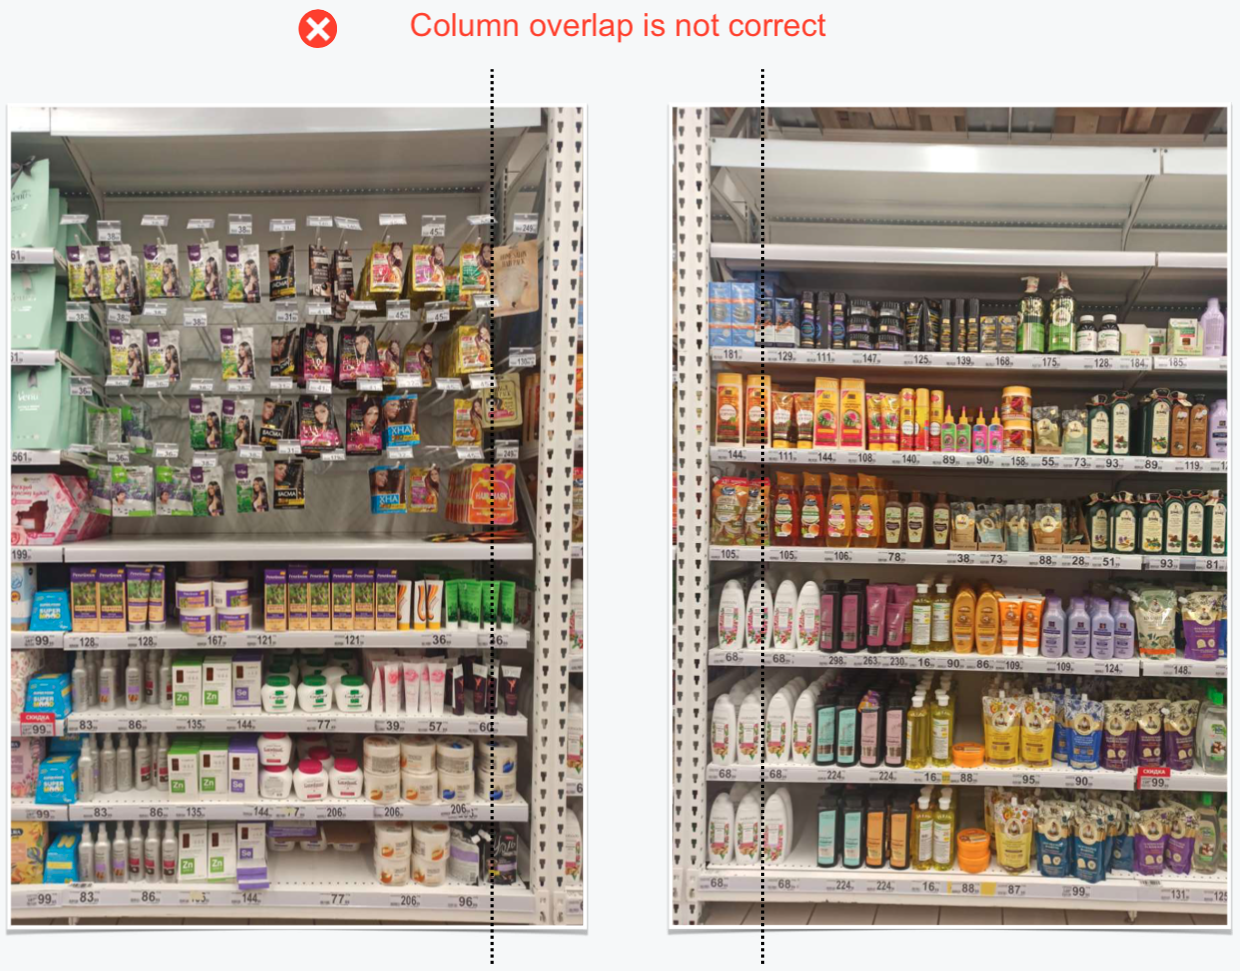
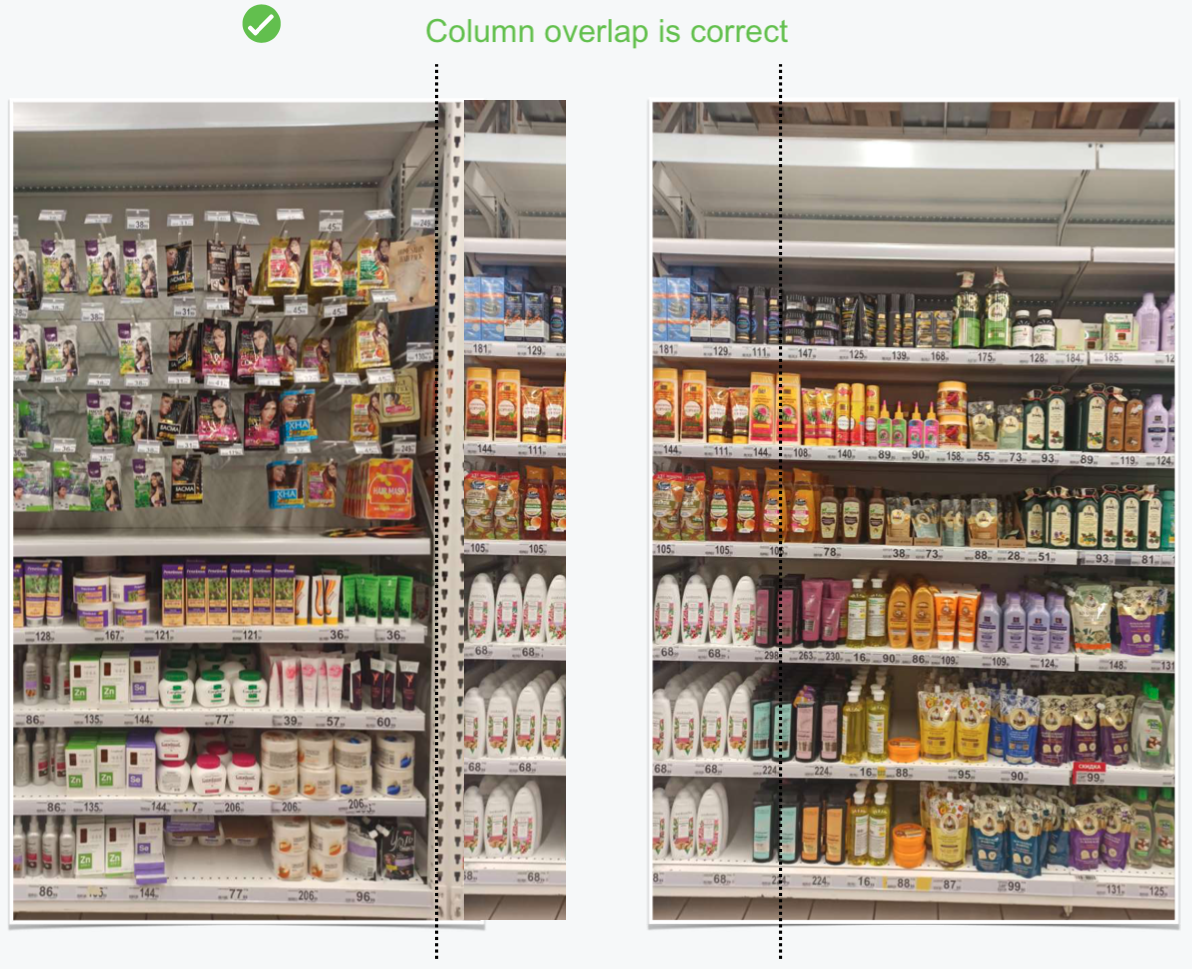
The shelf is interrupted by a narrow column
If a long shelf in a category is interrupted by a narrow column, you can shoot the entire shelf in one scene.
Important! The column should always be somewhere in the center of the photo. That is, the overlap should be done not by the column, but by the facings.
Tracking the tilt angle of the device
When shooting scenes, you have to hold your device in the upright position and without any rotation. A special sensor is used to track the tilt angle of the device. Its indicator is located on the camera screen.
When the maximum tilt angle (10 degrees) is exceeded, the icon of the rotation indicator becomes red and shooting is blocked. As the device angle is less than 10 degrees again – shooting becomes unlocked.
Some devices have problems with their rotation sensor – it can be too sensitive or work incorrectly. If it bothers your work, you always can switch this function off by simply clicking on the icon.
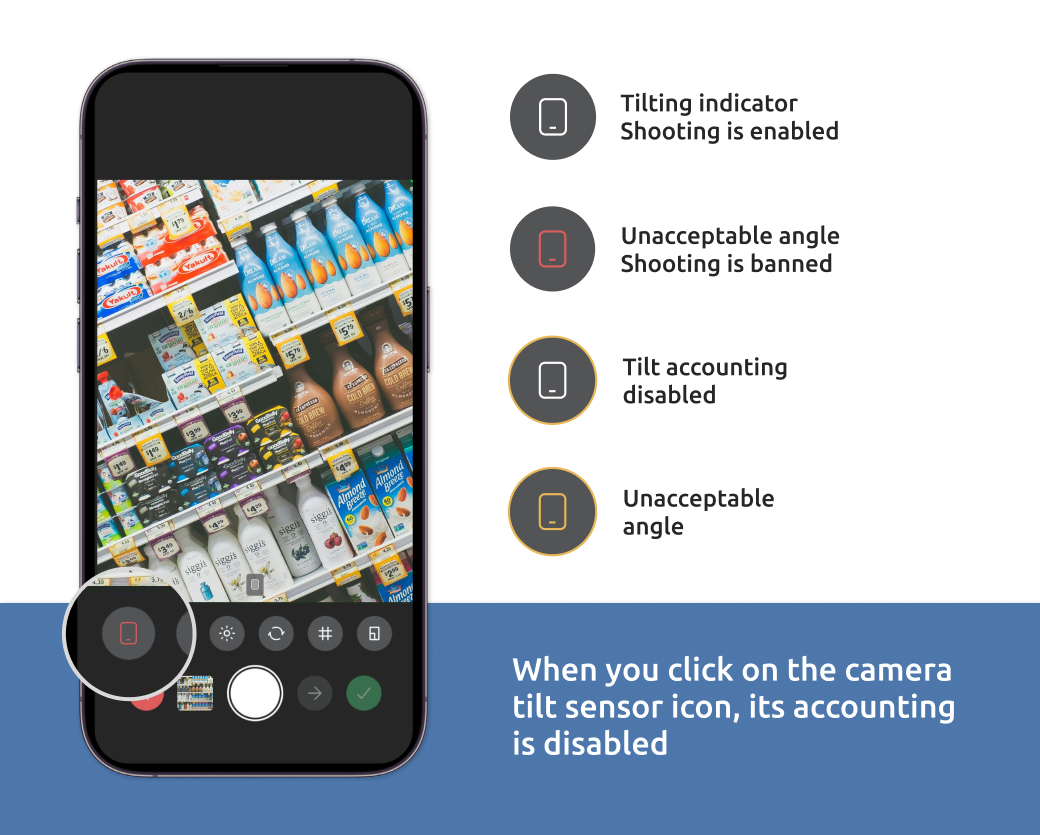
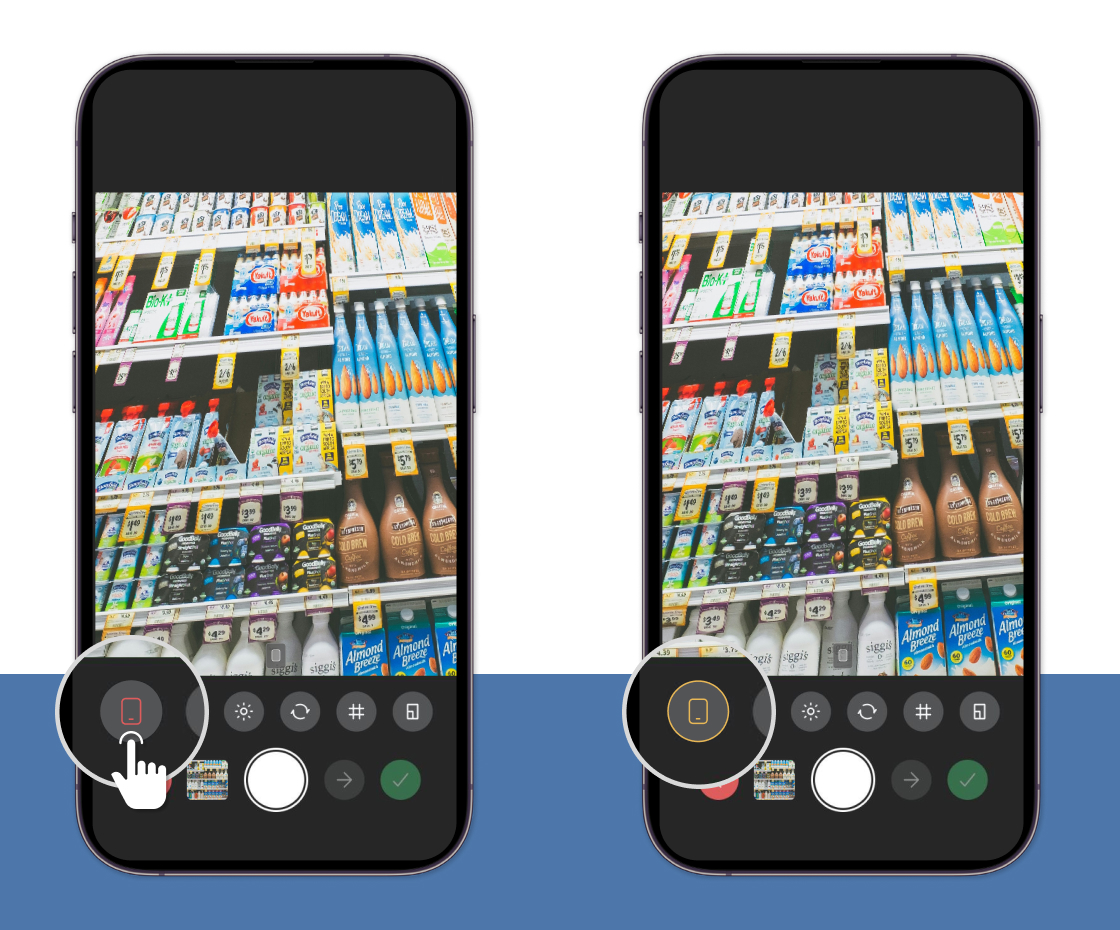
How to disable Picture taking lock
If the sensor icon turns red when shooting, it means that the ban on shooting has been enabled.
The ban on taking photos when the maximum tilt angle is exceeded can be disabled by clicking on the rotation indicator icon.
If the outline of the button turns yellow after clicking, it means that the ban has been disabled.
The tilt angle sensor will still work: the icon will light up yellow if the device is tilted too much in any direction, but the shooting is enabled.